The Release definition in VSTS allows you to define the steps needed to be taken to deploy a build of your application to your deployment environments. On the Releases tab of your project you click on the ‘New Definition’ button and then select the ‘Empty’ profile. On the next screen it will automatically fill in your current VSTS project and the VSTS build definition so you can just go ahead and click Create.

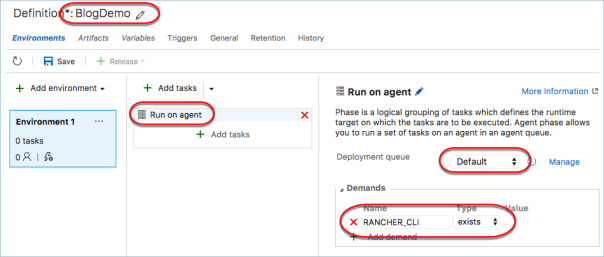
First things first is rename the autogenerated definition name in to something a little easier to work with. I’m going with the same name as my build definition to keep them in sync. Then we need to make sure that the release agent is the same one that we used for the build process. Click on the ‘Run On Agent’ section and then make sure you set the agent queue to be ‘Default’ and add in a demand of RANCHER_CLI exists.
The script that I use has a set of variables that need to be passed in to it, some variables are unique to the environment and some are available to the entire release definition. To setup the common variables you go to the Variables section and fill in the following with your details. ( Note : the value for DOCKER_HOST should actually read docker.io and not hub.docker.com as in the screenshot )

Next we come to the environment. The first thing I do is click on the environment name and rename it to reflect the environment that it is for. In this case I’m working on the environment for the development system so I rename it Development. Once renamed click on the three dots in the upper right of teh environment box and select the option to edit the environment variables.

Fill in your Rancher API endpoint and Rancher API keys for this environment and then also add in the Service ID for the dummy service that you setup in the previous blog post and then click OK to close the dialog box.
All that is left now is to add the deployment script which I’ll do in the next post.


You must be logged in to post a comment.